| .github | ||
| dev | ||
| doc | ||
| po | ||
| screenshots | ||
| src | ||
| .clang-format | ||
| .gitignore | ||
| .gitmodules | ||
| clangFormat.sh | ||
| default.nix | ||
| LICENSE | ||
| meson_options.txt | ||
| meson.build | ||
| mkTarball.sh | ||
| README.md | ||
| release.nix | ||
About
TuxClocker is a hardware controlling and monitoring program. TuxClocker consists of a DBus daemon and a Qt GUI that uses the daemon.
Chat
If you have any questions or suggestions, you can join the chat on Matrix or IRC
You can use IRC if you don't want to create an account. Both chats are bridged between each other.
Features
- Supports any number of devices at once
- Read and write device properties (Click on a selected node to edit)
- Connect any writable property to any readable property, for more possibilities than just fan curves. Currently only possible with range-based writable properties (Right click on a node)
- Reset writable properties to default (Right click on a node)
- Profiles
- Option to apply profile settings on startup/profile change
Currently missing from earlier releases
These are missing from the 1.0.0 release, but present in the 0.1.1 release. Refer to the 0.1.1 release readme if you wish to use these.
- AMD GPU support
- Graphs for properties
Currently supported devices and features
Nvidia GPUs
600 -series and above
- Support for multiple fans on one GPU
- Fan mode
- Fan speed
- Core and memory clocks
- Power limit
- Temperatures
- Utilizations
- Voltage reading
600 to 900 -series
- Voltage setting
Possible future improvements
- Support for more devices
- Support for more platforms than Linux
- Easier to discover UI
- CLI interface
Installation
Prerequisites
NVIDIA GPUs require Coolbits set to enable editing of most writable properties (31 for all functionality)
Using prebuilt binaries
You can use the tuxclocker.tar from the release page if you don't want to compile. The tarball is generated from the mkTarball.sh script.
- Download the tarball into some empty directory
- Extract the contents eg. (
tar xf tuxlocker.tar) - Run
sudo echo && ./run.shin the same folder (sudo is needed for the daemon)
Dependencies
qt (charts, base, dbus), boost-system, boost-filesystem, libnvml, libxnvctrl, xlib, libdrm, meson
NOTE: some distros like NixOS only contain libnvml as part of a fully featured CUDA package.
Note that these packages are likely called something different on each distribution.
For Nix
nix-shell release.nix
For Ubuntu (possibly outdated)
sudo apt install --yes --quiet --quiet \
    libqt5x11extras5-dev \
    qtbase5-dev \
    libqt5x11extras5 \
    libdrm-amdgpu1 \
    libdrm-common \
    libdrm-dev \
    nvidia-utils-440-server \
    nvidia-settings \
    libxnvctrl-dev
Compiling
Meson options
--prefix=<path> (install location prefix, usually '/usr')
-Dplugins=<true/false>
-Ddaemon=<true/false> (builds and installs 'tuxclockerd' binary/daemon)
Clone, build and install
git clone https://github.com/Lurkki14/tuxclocker
cd tuxclocker
git submodule init
git submodule update
meson build <meson options>
cd build
ninja && sudo ninja install
Running
Once you have installed everything into a proper location, TuxClocker is available with tuxclocker-qt from the terminal. There is currently no desktop entry so TuxClocker won't come up in any launcher.
If TuxClocker shows up with no items, there may be a problem with connecting to the DBus daemon. Refer to your system documentation on where DBus system service entries should be located. Alternatively, you can launch the needed components manually as explained in the Developing/Scripts section of the README.
Screenshots
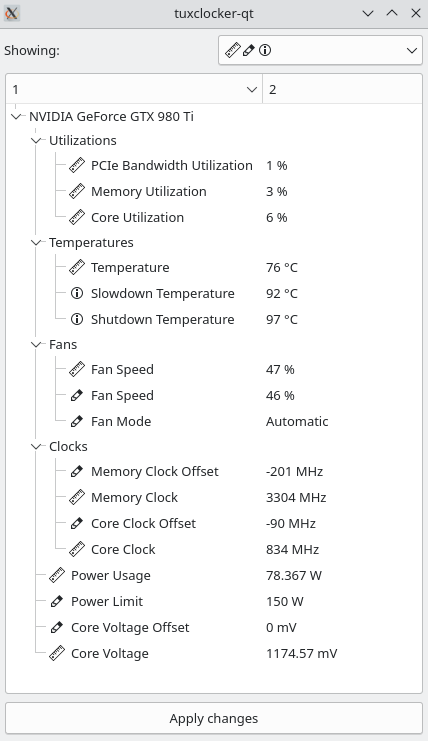
Main view
Editing an item

Parametrizing an item
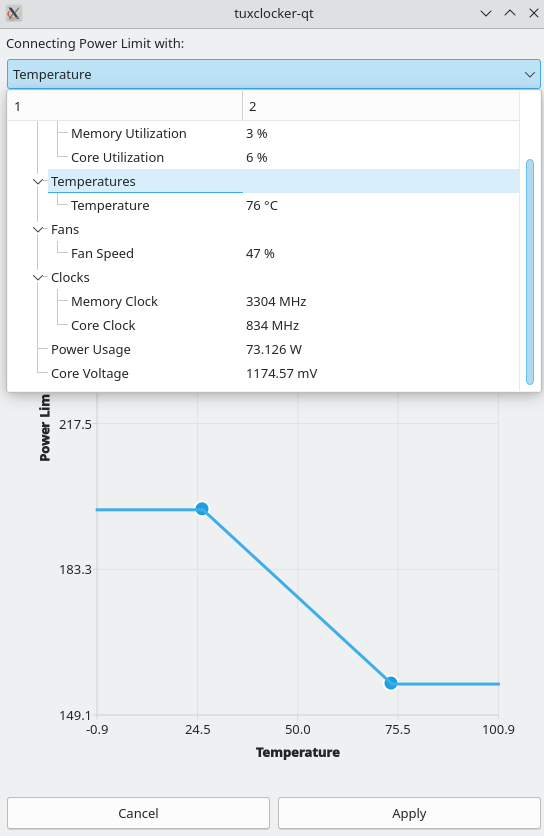
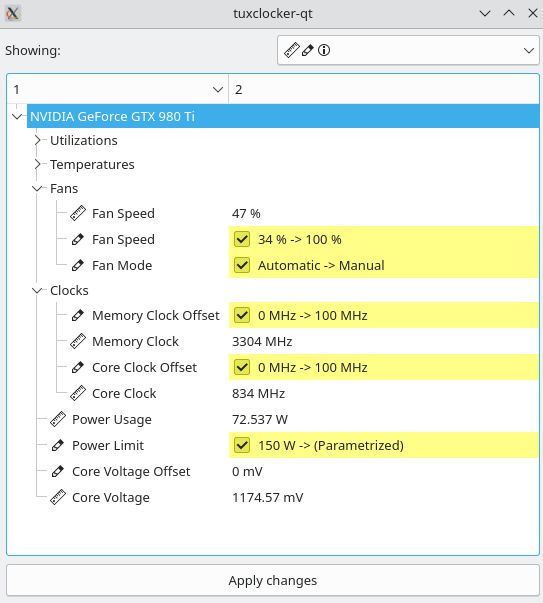
Showing pending changes
Settings

Developing
Formatting
TuxClocker uses clang-format. Code should be formatted with the provided clangFormat.sh script.
NOTE: to get designated initializers formatted like so:
auto Foo = Foo{
    .bar = 1,
    .baz = 2,
};
a trailing comma should be used after the last member (clang-format weirdness).
Scripts
There are a few scripts in dev/ for development convenience, mainly to deal with DBus. A separate DBus instance and custom config file is used, so the TuxClocker daemon is able to be registered without installing service files into the system.
Note: the following scripts assume TuxClocker is installed to inst/, so meson should be called as follows:
meson build --prefix=$(pwd)/inst
The scripts should be used in this order (they all have to be running simultaneously, so probably best to run in separate terminals):
dev/dbus-start.sh Starts a separate DBus instance.
dev/tuxclockerd-start.sh Launches tuxclockerd making it connect to our separate DBus instance and LD_LIBRARY_PATH set to find the built libtuxclocker.
dev/gui-start.sh Launches the TuxClocker GUI making it connect to our separate DBus instance, so it can find the TuxClocker DBus service.
You can also use a program like d-feet if you are only making changes to the daemon. (To be documented)