mirror of
https://github.com/89luca89/distrobox.git
synced 2026-08-19 01:14:49 -05:00

851 lines
33 KiB
Markdown
851 lines
33 KiB
Markdown
- [Distrobox](README.md)
|
|
- [Launch a distrobox from your applications list](#launch-a-distrobox-from-your-applications-list)
|
|
- [Create a distrobox with a custom HOME directory](#create-a-distrobox-with-a-custom-home-directory)
|
|
- [Mount additional volumes in a distrobox](#mount-additional-volumes-in-a-distrobox)
|
|
- [Use a different shell than the host](#use-a-different-shell-than-the-host)
|
|
- [Run the container with real root](#run-the-container-with-real-root)
|
|
- [Run Debian/Ubuntu container behind proxy](#run-debianubuntu-container-behind-proxy)
|
|
- [Using a command other than sudo to run a rootful container](#using-a-command-other-than-sudo-to-run-a-rootful-container)
|
|
- [Duplicate an existing distrobox](#duplicate-an-existing-distrobox)
|
|
- [Export to the host](#export-to-the-host)
|
|
- [Execute commands on the host](#execute-commands-on-the-host)
|
|
<!-- markdownlint-disable-next-line MD051 -->
|
|
- [Resolve "Error cannot open display: :0"](#resolve-error-cannot-open-display-0)
|
|
- [Using init system inside a distrobox](#using-init-system-inside-a-distrobox)
|
|
- [Using Docker inside a Distrobox](#using-docker-inside-a-distrobox)
|
|
- [Using Podman inside a Distrobox](#using-podman-inside-a-distrobox)
|
|
- [Using LXC inside a Distrobox](#using-lxc-inside-a-distrobox)
|
|
- [Using Waydroid inside a Distrobox](#using-waydroid-inside-a-distrobox)
|
|
- [Manual Installation](#manual-installation)
|
|
- [Automated Installation](#automated-installation)
|
|
- [Using host's Podman or Docker inside a Distrobox](#using-hosts-podman-or-docker-inside-a-distrobox)
|
|
- [Using distrobox as main cli](#using-distrobox-as-main-cli)
|
|
- [Using a different architecture](#using-a-different-architecture)
|
|
- [Using the GPU inside the container](#using-the-gpu-inside-the-container)
|
|
- [Using nvidia-container-toolkit](#using-nvidia-container-toolkit)
|
|
- [Slow creation on podman and image size getting bigger with distrobox create](#slow-creation-on-podman-and-image-size-getting-bigger-with-distrobox-create)
|
|
- [Container save and restore](#container-save-and-restore)
|
|
- [Check used resources](#check-used-resources)
|
|
- [Pre-installing additional package repositories](#pre-installing-additional-package-repositories)
|
|
- [Apply resource limitation on the fly](#apply-resource-limitation-on-the-fly)
|
|
- [Copy/yank text to host clipboard](#copy-text-to-host-clipboard)
|
|
|
|
---
|
|
|
|
# Useful tips
|
|
|
|
## Detect if you're in a distrobox
|
|
|
|
Being this tightly integrated, it may be useful to know when you're in a container or not.
|
|
|
|
To detect you can just check the environment variable `"${CONTAINER_ID}"`, if set, you're in a distrobox.
|
|
|
|
## Launch a distrobox from your applications list
|
|
|
|
Starting from distrobox 1.4.0, containers created will automatically generate a desktop entry.
|
|
For containers generated with older versions, you can use:
|
|
|
|
`distrobox generate-entry your-container-name`
|
|
|
|
To delete it:
|
|
|
|
`distrobox generate-entry your-container-name --delete`
|
|
|
|
## Create a distrobox with a custom HOME directory
|
|
|
|
`distrobox create` supports the use of the `--home` flag, as specified in the
|
|
usage [HERE](./usage/distrobox-create.md)
|
|
|
|
Simply use:
|
|
|
|
`distrobox create --name test --image your-chosen-image:tag --home /your/custom/home`
|
|
|
|
## Mount additional volumes in a distrobox
|
|
|
|
`distrobox create` supports the use of the `--volume` flag, as specified in the
|
|
usage [HERE](./usage/distrobox-create.md)
|
|
|
|
Simply use:
|
|
|
|
`distrobox create --name test --image your-chosen-image:tag --volume /your/custom/volume/path`
|
|
|
|
## Use a different shell than the host
|
|
|
|
From version 1.4.0, `distrobox enter` will execute the login shell of the container's user
|
|
by default. So, just change the default shell in the container using:
|
|
|
|
`chsh -s /bin/shell-to-use`
|
|
|
|
exit and log back in the container.
|
|
|
|
For version older than 1.4.0, distrobox will pick up the shell from the host and use it inside the container.
|
|
If you want a different one you can use:
|
|
|
|
```sh
|
|
SHELL=/bin/zsh distrobox create -n test
|
|
SHELL=/bin/zsh distrobox enter test
|
|
```
|
|
|
|
If you want to declaratively set a custom shell for each container when using `distrobox assemble`,
|
|
you can achieve this by using the `pre_init_hooks` option. For example:
|
|
|
|
```ini
|
|
pre_init_hooks="export SHELL=/bin/bash;"
|
|
```
|
|
|
|
## Run the container with real root
|
|
|
|
When using podman, distrobox will prefer to use rootless containers. In this mode the `root`
|
|
user inside the container is **not** the real `root` user of the host. But it still has
|
|
the same privileges as your normal `$USER`.
|
|
|
|
But what if you really really need those `root` privileges even inside the container?
|
|
|
|
Running `sudo distrobox` is not supported, instead, it is better to simply use normal
|
|
command with the `--root` or `-r` flag, so that distrobox can still integrate better
|
|
with your `$USER`.
|
|
|
|
```console
|
|
:~$ distrobox create --name test --image your-chosen-image:tag --root
|
|
```
|
|
|
|
Another use case, what if you want or need to run distrobox with the root user, in a login
|
|
shell?
|
|
|
|
Before the 1.4.3 release, it wasn't possible. We couldn't make a distinction between someone
|
|
running distrobox via `sudo` from someone logged in as the root user in a shell. Now things are
|
|
as easy as it would be if you were creating a rootless container:
|
|
|
|
```console
|
|
:~# distrobox create --name your-container --pull --image your-chosen-image:tag`
|
|
```
|
|
|
|
And:
|
|
|
|
```console
|
|
:~# distrobox enter your-container`
|
|
```
|
|
|
|
We trust you already know the implications of running distrobox, as well as anything else,
|
|
with the root user and that with great power comes great responsibilities.
|
|
|
|
## Run Debian/Ubuntu container behind proxy
|
|
|
|
It might be that you're trying to set-up your distrobox, but you're stuck behind a proxy.
|
|
A simple solution can be crafted using `pre-init-hooks`
|
|
|
|
```console
|
|
proxy=http://my_proxy.domain.example:3128
|
|
t="echo 'Acquire::http::Proxy \\\""${proxy}"\\\";' > /etc/apt/apt.conf.d/proxy.conf; echo 'Acquire::https::Proxy \\\""${proxy}"\\\";' >> /etc/apt/apt.conf.d/proxy.conf;"
|
|
http_proxy="${proxy}" distrobox create --image debian --name deb --pre-init-hooks "${t}"
|
|
```
|
|
|
|
This way, we're configuring `apt` before using it.
|
|
|
|
## Using a command other than sudo to run a rootful container
|
|
|
|
When using the `--root` option with Distrobox, internally, it uses `sudo` to be able to
|
|
interact with the rootful container through podman/docker, which will prompt for a valid
|
|
root password on the terminal. However, some users might prefer to use a command other
|
|
than `sudo` in order to authenticate as root; for example, `pkexec` could be used to
|
|
display a graphical authentication prompt. If you need this, make sure to specify
|
|
the desired command through the `DBX_SUDO_PROGRAM` environment variable
|
|
(supported by most `distrobox` subcommands), alongside `--root`. Sample usage:
|
|
|
|
`DBX_SUDO_PROGRAM="pkexec" distrobox create --name test --image your-chosen-image:tag --root`
|
|
|
|
Additionally, you may also have any further distrobox commands use `pkexec` (for example)
|
|
for rootful containers by appending the line `distrobox_sudo_program="pkexec"`
|
|
(replace `pkexec` with the desired program) to one of the config file paths that
|
|
distrobox supports; for example, to '~/.distroboxrc'.
|
|
|
|
It is also worth noting that, if your sudo program does not have persistence
|
|
(i.e., cooldown before asking for the root password again after a successful authentication)
|
|
configured, then you may have to enter the root password multiple times, as distrobox
|
|
calls multiple podman/docker commands under the hood. In order to avoid this, it is
|
|
recommended to either configure your sudo program to be persistent, or, if that's
|
|
not feasible, use `sudo` whenever possible (which has persistence enabled by default).
|
|
|
|
However, if you'd like to have a graphical authentication prompt, but would also like
|
|
to benefit from `sudo`'s persistence (to avoid prompting for a password multiple times in a row),
|
|
you may specify `sudo --askpass` as the sudo program.
|
|
The `--askpass` option makes sudo launch the program in the path (or name, if it is in `$PATH`)
|
|
specified by the `SUDO_ASKPASS` environment variable, and uses its output (to stdout)
|
|
as the password input to authenticate as root. If unsuccessful, it launches the program again,
|
|
until either it outputs the correct password, the user cancels the operation, or
|
|
a limit of amount of authentication attempts is reached.
|
|
|
|
So, for example, assume you'd like to use `zenity --password` to prompt for the sudo password.
|
|
You may save a script, e.g. `my-password-prompt`, to somewhere in your machine - say,
|
|
to `~/.local/bin/my-password-prompt` - with the following contents:
|
|
|
|
```sh
|
|
#!/bin/sh
|
|
zenity --password
|
|
```
|
|
|
|
Make it executable using, for example, `chmod` (in the example, by running `chmod +x ~/.local/bin/my-password-prompt` -
|
|
replace with the path to your script). Afterwards, make sure `SUDO_ASKPASS` is set to your newly-created script's path,
|
|
and also ensure `DBX_SUDO_PROGRAM` is set to `sudo --askpass`, and you should be good to go. For example,
|
|
running the below command should only prompt the root authentication GUI once throughout the whole process:
|
|
|
|
`SUDO_ASKPASS="$HOME/.local/bin/my-password-prompt" DBX_SUDO_PROGRAM="sudo --askpass" distrobox-ephemeral -r`
|
|
|
|
You may make these options persist by specifying those environment variables in your shell's rc file (such as `~/.bashrc`).
|
|
Note that this will also work if `distrobox_sudo_program="sudo --askpass"` is specified in one of distrobox's config files
|
|
(such as `~/.distroboxrc`), alongside `export SUDO_ASKPASS="/path/to/password/prompt/program"` (for example - however, this
|
|
last line is usually better suited to your shell's rc file).
|
|
|
|
## Duplicate an existing distrobox
|
|
|
|
It can be useful to just duplicate an already set up environment, to do this,
|
|
`distrobox create` supports the use of the
|
|
`--clone` flag, as specified in the usage [HERE](./usage/distrobox-create.md)
|
|
|
|
Simply use:
|
|
|
|
`distrobox create --name test --clone name-of-distrobox-to-clone`
|
|
|
|
## Export to the host
|
|
|
|
Distrobox supports exporting to the host either binaries or applications.
|
|
[Head over the usage page to have an explanation and examples.](usage/distrobox-export.md)
|
|
|
|
## Execute commands on the host
|
|
|
|
You can check this little post about [executing commands on the host.](posts/execute_commands_on_host.md)
|
|
|
|
## Resolve "Error cannot open display: :0"
|
|
|
|
If your container is not able to connect to your host xserver, make sure to
|
|
install `xhost` on the host machine and run `xhost +si:localuser:$USER`.
|
|
If you wish to enable this functionality on future reboots add the above command
|
|
to your `~/.distroboxrc`
|
|
|
|
```console
|
|
-$ cat ~/.distroboxrc
|
|
xhost +si:localuser:$USER >/dev/null
|
|
```
|
|
|
|
## Using init system inside a distrobox
|
|
|
|
You can use an init system inside the container. You can either use supported
|
|
pre-created images, or have to add additional packages.
|
|
|
|
Example of such images are:
|
|
|
|
- docker.io/almalinux/8-init
|
|
- registry.access.redhat.com/ubi7/ubi-init
|
|
- registry.access.redhat.com/ubi8/ubi-init
|
|
- registry.access.redhat.com/ubi9/ubi-init
|
|
- registry.opensuse.org/opensuse/leap:latest
|
|
- registry.opensuse.org/opensuse/tumbleweed:latest
|
|
|
|
You can use such feature using:
|
|
|
|
`distrobox create -i docker.io/almalinux/8-init --init --name test`
|
|
|
|
If you want to use a non-pre-create image, you'll need to add the additional package:
|
|
|
|
```console
|
|
distrobox create -i alpine:latest --init --additional-packages "openrc" -n test
|
|
distrobox create -i debian:stable --init --additional-packages "systemd libpam-systemd pipewire-audio-client-libraries" -n test
|
|
distrobox create -i ubuntu:22.04 --init --additional-packages "systemd libpam-systemd pipewire-audio-client-libraries" -n test
|
|
distrobox create -i archlinux:latest --init --additional-packages "systemd" -n test
|
|
distrobox create -i registry.opensuse.org/opensuse/tumbleweed:latest --init --additional-packages "systemd" -n test
|
|
distrobox create -i registry.fedoraproject.org/fedora:39 --init --additional-packages "systemd" -n test
|
|
```
|
|
|
|
Note however that in this mode, you'll not be able to access host's processes
|
|
from within the container.
|
|
|
|
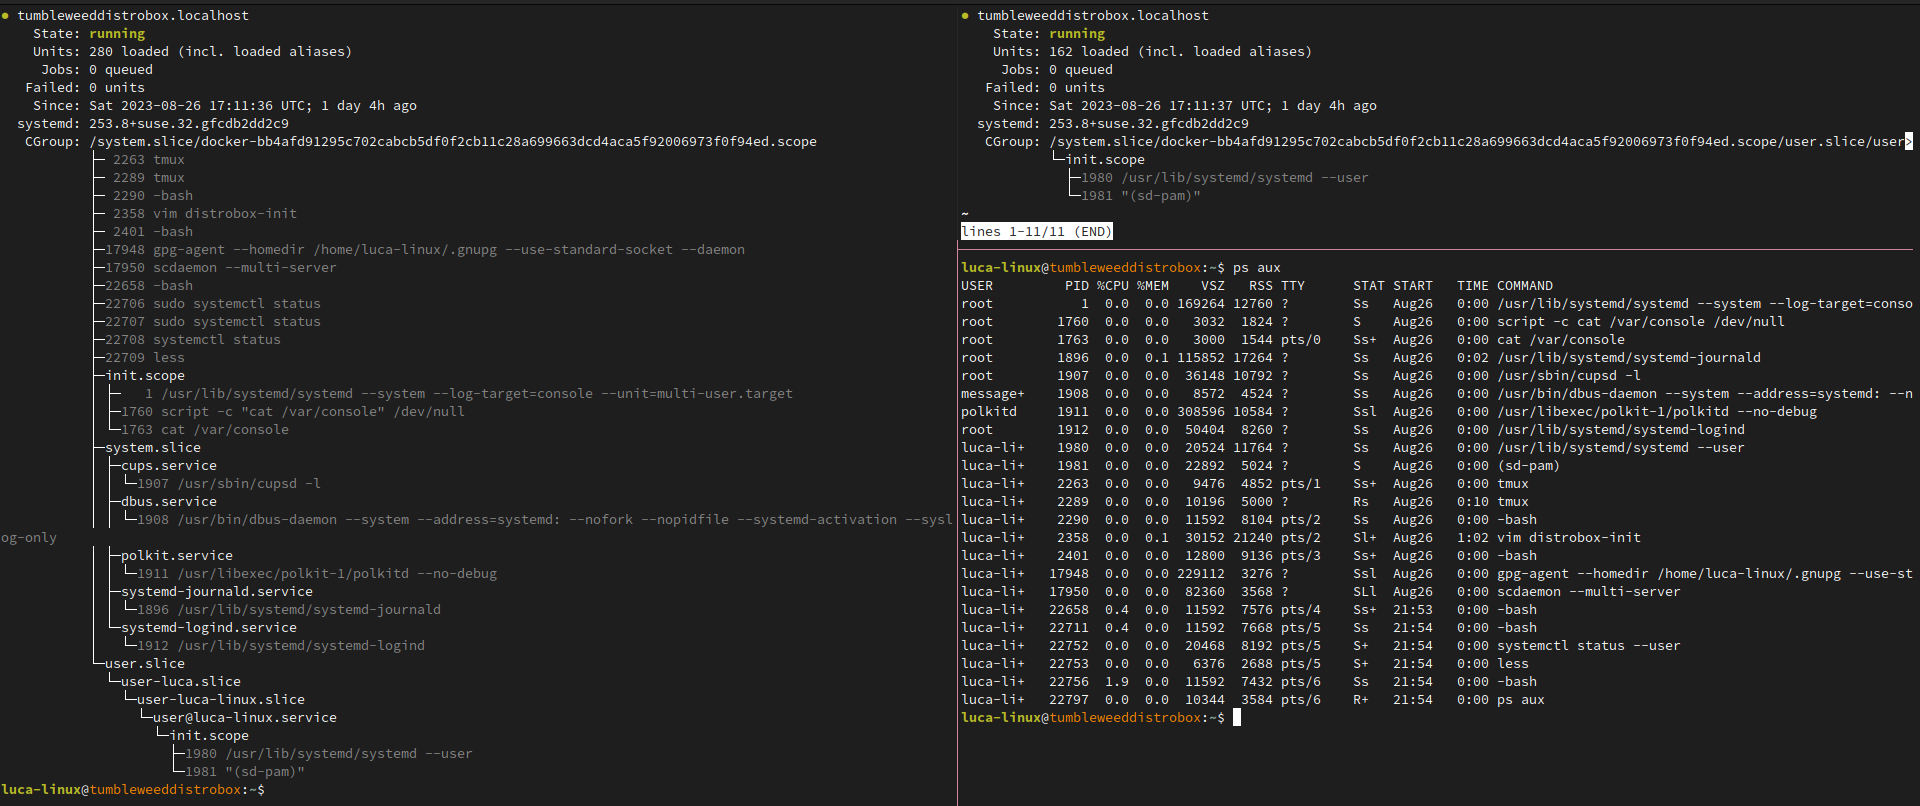
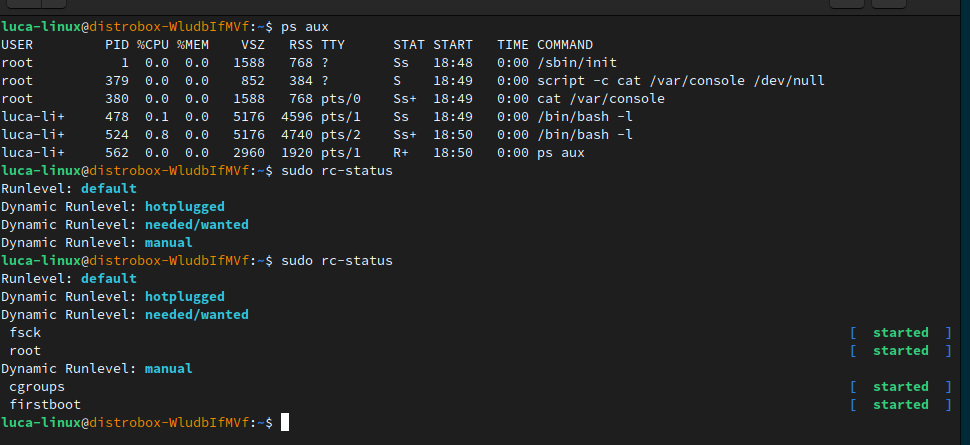
Result:
|
|
|
|
Systemd running on openSUSE
|
|
|
|
|
|
OpenRC running on Alpine Linux
|
|
|
|
|
|
Example use:
|
|
|
|
```shell
|
|
~$ distrobox create -i docker.io/almalinux/8-init --init --name test
|
|
|
|
user@test:~$ sudo systemctl enable --now sshd
|
|
|
|
user@test:~$ sudo systemctl status sshd
|
|
● sshd.service - OpenSSH server daemon
|
|
Loaded: loaded (sshd.service; enabled; vendor preset: enabled)
|
|
Active: active (running) since Fri 2022-01-28 22:54:50 CET; 17s ago
|
|
Docs: man:sshd(8)
|
|
man:sshd_config(5)
|
|
Main PID: 291 (sshd)
|
|
```
|
|
|
|
## Using Docker inside a Distrobox
|
|
|
|
You may want to run a separate instance of docker inside your container.
|
|
In order to do this, create a [container with an init system](#using-init-system-inside-a-distrobox)
|
|
using rootful Podman or Docker and using the **unshare-all** flag.
|
|
|
|
Example:
|
|
|
|
```sh
|
|
distrobox create --root \
|
|
--image registry.opensuse.org/opensuse/distrobox:latest \
|
|
--additional-packages "systemd docker" \
|
|
--init \
|
|
--unshare-all
|
|
```
|
|
|
|
Inside the container:
|
|
|
|
```console
|
|
luca-linux@tumbleweed:~$ sudo systemctl enable --now docker
|
|
luca-linux@tumbleweed:~$ sudo systemctl status docker
|
|
● docker.service - Docker Application Container Engine
|
|
Loaded: loaded (/usr/lib/systemd/system/docker.service; enabled; preset: disabled)
|
|
Active: active (running) since Sat 2023-08-26 19:21:34 UTC; 3min 47s ago
|
|
Docs: http://docs.docker.com
|
|
Main PID: 1924 (dockerd)
|
|
CPU: 1.268s
|
|
CGroup: /system.slice/docker-b63c525a32a313837146cfb00ed09c151eabd3137ad62779f47d3924c92f7b16.scope/system.slice/docker.service
|
|
├─1924 /usr/bin/dockerd --add-runtime oci=/usr/sbin/docker-runc
|
|
└─1942 containerd --config /var/run/docker/containerd/containerd.toml --log-level warn
|
|
|
|
Aug 26 19:21:31 tumbleweed.localhost dockerd[1924]: time="2023-08-26T19:21:31.188589166Z" level=error msg="failed to mount overlay: invalid argument" storage-driver=overlay2
|
|
Aug 26 19:21:31 tumbleweed.localhost dockerd[1924]: time="2023-08-26T19:21:31.391206840Z" level=warning msg="WARNING: No swap limit support"
|
|
Aug 26 19:22:54 tumbleweed.localhost dockerd[1942]: time="2023-08-26T19:22:54.385157019Z" level=info msg="loading plugin \"io.containerd.event.v1.publisher\"..." runtime=io.containerd.runc.v2 type=io.containerd.event.v1
|
|
Aug 26 19:22:54 tumbleweed.localhost dockerd[1942]: time="2023-08-26T19:22:54.385241039Z" level=info msg="loading plugin \"io.containerd.internal.v1.shutdown\"..." runtime=io.containerd.runc.v2 type=io.containerd.internal.v1
|
|
Aug 26 19:22:54 tumbleweed.localhost dockerd[1942]: time="2023-08-26T19:22:54.385250887Z" level=info msg="loading plugin \"io.containerd.ttrpc.v1.task\"..." runtime=io.containerd.runc.v2 type=io.containerd.ttrpc.v1
|
|
Aug 26 19:22:54 tumbleweed.localhost dockerd[1942]: time="2023-08-26T19:22:54.385411802Z" level=info msg="starting signal loop" namespace=moby path=/run/docker/containerd/daemon/io.containerd.runtime.v2.task/moby/bd4cb19537b4c39131b084e04>
|
|
Aug 26 19:23:16 tumbleweed.localhost dockerd[1942]: time="2023-08-26T19:23:16.575589748Z" level=error msg="failed to enable controllers ([cpuset cpu io memory hugetlb pids rdma misc])" error="failed to write subtree controllers [cpuset cp>
|
|
Aug 26 19:23:16 tumbleweed.localhost dockerd[1942]: time="2023-08-26T19:23:16.575764283Z" level=warning msg="error from *cgroupsv2.Manager.EventChan" error="failed to add inotify watch for \"/sys/fs/cgroup/system.slice/docker-b63c525a32a3>
|
|
Aug 26 19:23:44 tumbleweed.localhost dockerd[1942]: time="2023-08-26T19:23:44.744144975Z" level=warning msg="cleaning up after shim disconnected" id=bd4cb19537b4c39131b084e04c354712bac71c6d1ced33d6d1d6933ada0507cc namespace=moby
|
|
Aug 26 19:23:44 tumbleweed.localhost dockerd[1942]: time="2023-08-26T19:23:44.754027382Z" level=warning msg="cleanup warnings time=\"2023-08-26T19:23:44Z\" level=info msg=\"starting signal loop\" namespace=moby pid=2221 runtime=io.contain>
|
|
luca-linux@tumbleweed:~$ sudo docker run --rm -ti alpine
|
|
/ #
|
|
```
|
|
|
|
## Using Podman inside a Distrobox
|
|
|
|
You may want to run a separate instance of podman inside your container.
|
|
In order to do this, create a container using rootful Podman or Docker
|
|
and using the **unshare-all** flag.
|
|
|
|
Example:
|
|
|
|
```sh
|
|
distrobox create --root \
|
|
--image registry.opensuse.org/opensuse/distrobox:latest \
|
|
--additional-packages "podman" \
|
|
--unshare-all
|
|
```
|
|
|
|
Inside it install podman, and add subuids for the user:
|
|
|
|
```sh
|
|
sudo usermod --add-subuids 10000-65536 $USER
|
|
sudo usermod --add-subgids 10000-65536 $USER
|
|
cat << EOF | sudo tee /etc/containers/containers.conf
|
|
[containers]
|
|
netns="host"
|
|
userns="host"
|
|
ipcns="host"
|
|
utsns="host"
|
|
cgroupns="host"
|
|
log_driver = "k8s-file"
|
|
[engine]
|
|
cgroup_manager = "cgroupfs"
|
|
events_logger="file"
|
|
EOF
|
|
```
|
|
|
|
Then you'll be able to use both rootful and rootless podman inside the container:
|
|
|
|
```console
|
|
luca-linux@tumbleweed:~> podman run --rm -ti alpine
|
|
/ #
|
|
luca-linux@tumbleweed:~> sudo podman run --rm -ti alpine
|
|
/ #
|
|
```
|
|
|
|
## Using LXC inside a Distrobox
|
|
|
|
You may want to run an LXC instance inside your container.
|
|
In order to do this, create a [container with an init system](#using-init-system-inside-a-distrobox)
|
|
using the **unshare-all** flag, this works with either docker, rootful podman, or rootless podman.
|
|
|
|
Example:
|
|
|
|
```sh
|
|
distrobox create --root \
|
|
--image registry.opensuse.org/opensuse/distrobox:latest \
|
|
--additional-packages "systemd lxc" \
|
|
--init \
|
|
--unshare-all
|
|
```
|
|
|
|
Inside the container we will need to first setup the lxcbr0 network and enable the services:
|
|
|
|
```console
|
|
luca-linux@tumbleweed:~> sudo systemctl enable --now lxc-monitord.service lxc-net.service lxc.service lxcfs.service
|
|
Created symlink /etc/systemd/system/multi-user.target.wants/lxc-monitord.service → /usr/lib/systemd/system/lxc-monitord.service.
|
|
Created symlink /etc/systemd/system/multi-user.target.wants/lxc-net.service → /usr/lib/systemd/system/lxc-net.service.
|
|
Created symlink /etc/systemd/system/multi-user.target.wants/lxc.service → /usr/lib/systemd/system/lxc.service.
|
|
Created symlink /etc/systemd/system/multi-user.target.wants/lxcfs.service → /usr/lib/systemd/system/lxcfs.service.
|
|
luca-linux@tumbleweed:~> ip a
|
|
1: lo: <LOOPBACK,UP,LOWER_UP> mtu 65536 qdisc noqueue state UNKNOWN group default qlen 1000
|
|
link/loopback 00:00:00:00:00:00 brd 00:00:00:00:00:00
|
|
inet 127.0.0.1/8 scope host lo
|
|
valid_lft forever preferred_lft forever
|
|
inet6 ::1/128 scope host proto kernel_lo
|
|
valid_lft forever preferred_lft forever
|
|
2: tap0: <BROADCAST,UP,LOWER_UP> mtu 65520 qdisc fq_codel state UNKNOWN group default qlen 1000
|
|
link/ether 02:81:bf:43:1e:65 brd ff:ff:ff:ff:ff:ff
|
|
inet 10.0.2.100/24 brd 10.0.2.255 scope global tap0
|
|
valid_lft forever preferred_lft forever
|
|
inet6 fd00::81:bfff:fe43:1e65/64 scope global dynamic mngtmpaddr proto kernel_ra
|
|
valid_lft 86309sec preferred_lft 14309sec
|
|
inet6 fe80::81:bfff:fe43:1e65/64 scope link proto kernel_ll
|
|
valid_lft forever preferred_lft forever
|
|
luca-linux@tumbleweed:~> sudo ip link add name lxcbr0 type bridge
|
|
luca-linux@tumbleweed:~> sudo ip link set dev lxcbr0 up
|
|
luca-linux@tumbleweed:~> sudo ip link set tap0 master lxcbr0
|
|
luca-linux@tumbleweed:~> sudo ip address add 10.0.2.100/24 dev lxcbr0
|
|
```
|
|
|
|
Then we can proceed with the LXC container creation:
|
|
|
|
```console
|
|
luca-linux@tumbleweed:~> sudo lxc-create -n test-nested-lxc -t download
|
|
[ ... ] # Here do the interactive rootfs choice, I'll use alpine:edge amd64
|
|
|
|
Downloading the image index
|
|
Downloading the rootfs
|
|
Downloading the metadata
|
|
The image cache is now ready
|
|
Unpacking the rootfs
|
|
|
|
---
|
|
You just created an Alpinelinux edge x86_64 (20230826_13:00) container.
|
|
|
|
luca-linux@tumbleweed:~> sudo lxc-start test-nested-lxc
|
|
luca-linux@tumbleweed:~> sudo lxc-attach test-nested-lxc
|
|
/ # ps aux
|
|
PID USER TIME COMMAND
|
|
1 root 0:00 /sbin/init
|
|
266 root 0:00 /sbin/syslogd -t -n
|
|
273 root 0:00 /sbin/openrc default
|
|
293 root 0:00 /usr/sbin/crond -c /etc/crontabs -f
|
|
300 root 0:00 {networking} /sbin/openrc-run /etc/init.d/networking --lockfd 4 start
|
|
301 root 0:00 {openrc-run.sh} /bin/sh /lib/rc/sh/openrc-run.sh /etc/init.d/networking start
|
|
347 root 0:00 ifup -i /etc/network/interfaces eth0
|
|
367 root 0:00 {dhcp} /bin/sh /usr/libexec/ifupdown-ng/dhcp
|
|
372 root 0:00 /sbin/udhcpc -b -R -p /var/run/udhcpc.eth0.pid -i eth0 -x hostname:test-nested-lxc
|
|
375 root 0:00 /bin/ash
|
|
376 root 0:00 ps aux
|
|
/ #
|
|
```
|
|
|
|
And you have a working LXC inside your Distrobox container.
|
|
|
|
## Using Waydroid inside a Distrobox
|
|
|
|
Waydroid is a popular solution for running Android applications on Linux using an LXC container.
|
|
Since these containers run inside a Distrobox, you can also run Waydroid.
|
|
|
|
> **Note**: Wayland and the `binder_linux` module are required at the host level. You can install
|
|
> the DKMS from the [choff/anbox-modules](https://github.com/choff/anbox-modules) repository.
|
|
|
|
### Manual Installation
|
|
|
|
To do this, we need a rootful container [with Systemd](#using-init-system-inside-a-distrobox) plus
|
|
some additional dependencies (tested with Vanilla OS Pico and Debian Sid):
|
|
|
|
- libpam-systemd
|
|
- curl
|
|
- kmod
|
|
- dbus-x11
|
|
- iptables
|
|
- mutter
|
|
|
|
Let's create a rootful and unshared container as follows:
|
|
|
|
```sh
|
|
distrobox create --root \
|
|
--image ghcr.io/vanilla-os/pico:main \
|
|
--additional-packages "systemd libpam-systemd curl kmod dbus-x11 iptables mutter" \
|
|
--init \
|
|
--unshare-all \
|
|
--name waydroid
|
|
```
|
|
|
|
Once it's started with `distrobox enter --root waydroid`, we can proceed with the Waydroid
|
|
installation from the official repository:
|
|
|
|
```bash
|
|
curl --progress-bar --proto '=https' --tlsv1.2 -Sf https://repo.waydro.id/waydroid.gpg --output /usr/share/keyrings/waydroid.gpg
|
|
echo "deb [signed-by=/usr/share/keyrings/waydroid.gpg] https://repo.waydro.id/ bookworm main" | tee /etc/apt/sources.list.d/waydroid.list
|
|
sudo apt update
|
|
sudo apt install waydroid
|
|
```
|
|
|
|
Then proceed with its initialization using:
|
|
|
|
```bash
|
|
export XDG_RUNTIME_DIR="/run/host/${XDG_RUNTIME_DIR}"
|
|
export DBUS_SESSION_BUS_ADDRESS="unix:path=/run/host/$(echo "${DBUS_SESSION_BUS_ADDRESS}" | cut -d '=' -f2-)"
|
|
|
|
waydroid init
|
|
```
|
|
|
|
The above environment variables must be present each time the `waydroid` command is used.
|
|
|
|
### Automated Installation
|
|
|
|
The [Waydroid image](https://github.com/Vanilla-OS/waydroid-image/blob/main/recipe.yml) from
|
|
the Vanilla OS Team is designed to streamline the entire setup process. To use it, proceed as follows:
|
|
|
|
```bash
|
|
distrobox create --root \
|
|
--image ghcr.io/vanilla-os/waydroid:main \
|
|
--init \
|
|
--unshare-all \
|
|
--name waydroid
|
|
|
|
distrobox enter --root waydroid
|
|
```
|
|
|
|
Once started, Waydroid is automatically executed via Systemd. Check for the process to finish using
|
|
the `systemctl status waydroid-init` command, then start using Waydroid with:
|
|
|
|
```bash
|
|
ewaydroid --help
|
|
```
|
|
|
|
Make sure to use the `ewaydroid` command each time you need to work with Waydroid. This command is a
|
|
wrapper that sets the proper environment variables to make it work with the host D-Bus.
|
|
|
|
## Using host's Podman or Docker inside a Distrobox
|
|
|
|
You can easily control host's instance of docker or podman, using `distrobox-host-exec`
|
|
You can use:
|
|
|
|
```console
|
|
sudo ln -s /usr/bin/distrobox-host-exec /usr/local/bin/podman
|
|
```
|
|
|
|
or
|
|
|
|
```console
|
|
sudo ln -s /usr/bin/distrobox-host-exec /usr/local/bin/docker
|
|
```
|
|
|
|
This will create a `podman` or `docker` command inside the distrobox that will
|
|
transparently execute the command on the host.
|
|
|
|
## Using distrobox as main cli
|
|
|
|
In case you want (like me) to use your container as the main CLI environment,
|
|
it comes handy to use `gnome-terminal` profiles to create a dedicated setup for it:
|
|
|
|

|
|
|
|
Personally, I just bind `Ctrl-Alt-T` to the Distrobox profile and `Super+Enter`
|
|
to the Host profile.
|
|
|
|
For other terminals, there are similar features (profiles) or you can set up a
|
|
dedicated shortcut to launch a terminal directly in the distrobox
|
|
|
|
## Using a different architecture
|
|
|
|
In case you want to run a container with a different architecture from your host,
|
|
you can leverage the use of `qemu` and support from podman/docker.
|
|
|
|
Install on your host the following dependencies:
|
|
|
|
- qemu
|
|
- qemu-user-static
|
|
- binfmt-support
|
|
|
|
Then you can easily run the image you like:
|
|
|
|
```console
|
|
~$ uname -m
|
|
x86_64
|
|
~$ distrobox create --image debian --additional-flags --platform=linux/aarch64 -n debian-arm64
|
|
~$ distrobox enter debian-arm64
|
|
...
|
|
user@debian-arm64:~$ uname -m
|
|
aarch64
|
|
```
|
|
|
|

|
|
|
|
## Using the GPU inside the container
|
|
|
|
For Intel and AMD GPUs, the support is baked in, as the containers will install
|
|
their latest available mesa/dri drivers.
|
|
|
|
For NVidia, you can use the `--nvidia` flag during create, see [distrobox-create](./usage/distrobox-create.md)
|
|
documentation to discover how to use it.
|
|
|
|
```console
|
|
~$ distrobox create --nvidia --name ubuntu-nvidia --image ubuntu:latest
|
|
```
|
|
|
|
### Using nvidia-container-toolkit
|
|
|
|
Alternatively from the `--nvidia` flag, you can use NVidia's own [nvidia-container-toolkit](https://docs.nvidia.com/datacenter/cloud-native/container-toolkit/user-guide.html).
|
|
After following the [official guide to set nvidia-ctk up](https://docs.nvidia.com/datacenter/cloud-native/container-toolkit/user-guide.html)
|
|
you can use it from distrobox doing:
|
|
|
|
In case of podman container manager, run:
|
|
|
|
```console
|
|
distrobox create --name example-nvidia-toolkit --additional-flags "--gpus all" --image docker.io/nvidia/cuda
|
|
```
|
|
|
|
In case of docker container manager, run:
|
|
|
|
```console
|
|
distrobox create --name example-nvidia-toolkit --additional-flags "--gpus all --device=nvidia.com/gpu=all" --image docker.io/nvidia/cuda
|
|
```
|
|
|
|
## Slow creation on podman and image size getting bigger with distrobox create
|
|
|
|
For rootless podman 3.4.0 and upward, adding this to your `~/.config/containers/storage.conf`
|
|
file will improve container creation speed and fix issues with images getting
|
|
bigger when using rootless containers.
|
|
|
|
```conf
|
|
[storage]
|
|
driver = "overlay"
|
|
|
|
[storage.options.overlay]
|
|
mount_program = "/usr/bin/fuse-overlayfs"
|
|
```
|
|
|
|
Note that this is necessary only on Kernel version older than `5.11` .
|
|
From version `5.11` onwards native `overlayfs` is supported and reports noticeable
|
|
gains in performance as explained [HERE](https://www.redhat.com/sysadmin/podman-rootless-overlay)
|
|
|
|
## Permission problems when using VirtualBox
|
|
|
|
If you have VirtualBox installed on your host, you may encounter some permission
|
|
problems using **rootless Podman**:
|
|
|
|
```log
|
|
Error: unable to start container "XYZ": runc: runc create failed: unable to start container process: error during container init: error mounting "/dev/vboxusb/002/005" to rootfs at "/dev/vboxusb/002/005": lstat /..../dev/vboxusb/002: permission denied: OCI permission denied
|
|
```
|
|
|
|
This is because a rootless container done with `runc` will not port the host's groups
|
|
into the container.
|
|
|
|
The solution is to install `crun` from your package manager, and recreate your container.
|
|
|
|
crun supports the flag
|
|
|
|
```sh
|
|
run.oci.keep_original_groups=1
|
|
```
|
|
|
|
Which will allow porting the host's group inside the container, thus making it possible
|
|
for the rootless container to read vbox files.
|
|
|
|
## Container save and restore
|
|
|
|
To save, export and reuse an already configured container, you can leverage
|
|
`podman save` or `docker save` and `podman import` or `docker import` to
|
|
create snapshots of your environment.
|
|
|
|
---
|
|
|
|
To save a container to an image:
|
|
|
|
with podman:
|
|
|
|
```sh
|
|
podman container commit -p distrobox_name image_name_you_choose
|
|
podman save image_name_you_choose:latest | bzip2 > image_name_you_choose.tar.bz
|
|
```
|
|
|
|
with docker:
|
|
|
|
```sh
|
|
docker container commit -p distrobox_name image_name_you_choose
|
|
docker save image_name_you_choose:latest | gzip > image_name_you_choose.tar.gz
|
|
```
|
|
|
|
This will create a tar.gz of the container of your choice at that exact moment.
|
|
|
|
---
|
|
|
|
Now you can backup that archive or transfer it to another host, and to restore it
|
|
just run
|
|
|
|
```sh
|
|
podman load < image_name_you_choose.tar.bz2
|
|
```
|
|
|
|
or
|
|
|
|
```sh
|
|
docker load < image_name_you_choose.tar.gz
|
|
```
|
|
|
|
And create a new container based on that image:
|
|
|
|
```sh
|
|
distrobox create --image image_name_you_choose:latest --name distrobox_name
|
|
distrobox enter --name distrobox_name
|
|
```
|
|
|
|
And you're good to go, now you can reproduce your personal environment everywhere
|
|
in simple (and scriptable) steps.
|
|
|
|
## Check used resources
|
|
|
|
- You can always check how much space a `distrobox` is taking by using `podman` command:
|
|
|
|
`podman system df -v` or `docker system df -v`
|
|
|
|
## Pre-installing additional package repositories
|
|
|
|
On Red Hat Enterprise Linux and its derivatives, the amount of packages in the
|
|
base repositories is limited, and additional packages need to be brought in by
|
|
enabling additional repositories such as [EPEL](https://docs.fedoraproject.org/en-US/epel/).
|
|
|
|
You can use `--init-hooks` to automate this, but this does not solve the
|
|
issue for package installations done during initialization itself, e.g. if
|
|
the shell you use on the host is not available in the default repos (e.g.
|
|
`fish`).
|
|
|
|
Use the pre-initialization hooks for this:
|
|
|
|
```shell
|
|
distrobox create -i docker.io/almalinux/8-init --init --name test --pre-init-hooks "dnf -y install dnf-plugins-core && dnf config-manager --enable powertools && dnf -y install epel-release"
|
|
```
|
|
|
|
```shell
|
|
distrobox create -i docker.io/library/almalinux:9 -n alma9 --pre-init-hooks "dnf -y install dnf-plugins-core && dnf config-manager --enable crb && dnf -y install epel-release"
|
|
```
|
|
|
|
```shell
|
|
distrobox create -i quay.io/centos/centos:stream9 c9s --pre-init-hooks "dnf -y install dnf-plugins-core && dnf config-manager --enable crb && dnf -y install epel-next-release"
|
|
```
|
|
|
|
## Apply resource limitation on the fly
|
|
|
|
Podman has `--cpuset-cpus` and `--memory` flags to apply limitation on how much resources a container can use. However,
|
|
these flags only work during container creation (`podman create` / `podman run`) and not after it's created
|
|
(`podman exec`, which is used by Distrobox to execute commands inside of container), which means changing resource
|
|
limitation requires recreation of a container.
|
|
|
|
Nonetheless you can still apply resource limitation using systemd's resource control functionality. It's not recommended
|
|
to pass resource limitation arguments (e.g. `--cpuset-cpus` and `--memory`) to `distrobox create --additional-flags`
|
|
as systemd already provides much more flexible resource control functionality.
|
|
|
|
To list all distroboxes and their full IDs:
|
|
|
|
```bash
|
|
podman ps --all --no-trunc --format "{{.Names}} {{.ID}} {{.Labels}}" | grep "manager:distrobox" | cut -d " " -f1,2 | column -t
|
|
```
|
|
|
|
- Removing `--all` flag will cause the output to only contain currently running distroboxes
|
|
|
|
To check your container status with `systemctl`:
|
|
|
|
```bash
|
|
systemctl --user status libpod-$UUID.scope
|
|
```
|
|
|
|
- Your distrobox needs to be running for its scope to present (e.g. `distrobox enter` before running this command)
|
|
- Replace `$UUID` with your container's real full ID
|
|
- To make things easier when tweaking properties, optionally set a environment variable for the current shell:
|
|
|
|
bash/zsh:
|
|
|
|
```bash
|
|
UUID=XXXXXXXXX
|
|
```
|
|
|
|
fish:
|
|
|
|
```fish
|
|
set UUID XXXXXXXXX
|
|
```
|
|
|
|
Everything provided by `systemd.resource-control` could be applied to your distrobox. For example:
|
|
|
|
To make your distrobox only run on CPU0 and CPU1:
|
|
|
|
```bash
|
|
systemctl --user set-property libpod-$UUID.scope AllowedCPUs=0,1
|
|
```
|
|
|
|
To hard throttle your distrobox to not use above 20% of CPU:
|
|
|
|
```bash
|
|
systemctl --user set-property libpod-$UUID.scope CPUQuota=20%
|
|
```
|
|
|
|
To limit your distrobox's maximum amount of memory:
|
|
|
|
```bash
|
|
systemctl --user set-property libpod-$UUID.scope MemoryMax=2G
|
|
```
|
|
|
|
To give your distrobox less IO bandwidth when IO is overloaded:
|
|
|
|
```bash
|
|
systemctl --user set-property libpod-$UUID.scope IOWeight=1
|
|
```
|
|
|
|
- `IOWeight` accepts value from `1` to `10000`, higher means more bandwidth.
|
|
|
|
To see all applicable properties:
|
|
|
|
```bash
|
|
man systemd.resource-control
|
|
```
|
|
|
|
Changes are transient, meaning you lose the resource limitation properties when distrobox is stopped and restarted.
|
|
|
|
To make certain changes persistent, first check the currently active properties:
|
|
|
|
```bash
|
|
systemctl --user status libpod-$UUID.scope
|
|
```
|
|
|
|
Look for the `Drop-In` lines. Something like this should be shown:
|
|
|
|
```console
|
|
Drop-In: /run/user/1000/systemd/transient/libpod-45ae38d61c9a636230b2ba89ea07792d662e01cd9ee38d04feb0a994b039a271.scope.d
|
|
└─50-AllowedCPUs.conf
|
|
```
|
|
|
|
Move the transient overrides to persistent overrides:
|
|
|
|
```bash
|
|
mkdir -p ~/.config/systemd/user/libpod-$UUID.scope.d
|
|
mv --target-directory="$HOME/.config/systemd/user/libpod-$UUID.scope.d" \
|
|
"/run/user/$(id -u)/systemd/transient/libpod-$UUID.scope.d/50-AllowedCPUs.conf"
|
|
```
|
|
|
|
- Replace `$(id -u)` with your real user id if it did not get expanded properly.
|
|
- `50-AllowedCPUs.conf` is only an example. Replace it with something you want to keep persistently.
|
|
|
|
Then reload systemd daemon to apply the changes:
|
|
|
|
```bash
|
|
systemctl --user daemon-reload
|
|
```
|
|
|
|
## Copy text to host clipboard
|
|
|
|
To copy/yank text from the container to the host clipboard you need to install
|
|
`xsel` in the container for Xorg hosts or `wlroots` for wayland hosts.
|